Posts

AECP Level 2 Final Challenge Part II

Image
For the second part of the final challenge, I had to alter an item. I mean, you could do so many things with paper. I already did a lot for decoration with paper, especially for Birthdays. But I wanted to do something I never did before.  Then I remembered a white lamp I have and thought, what if I’m going to ad flowers to this. This was the start of my project.   As components I went for: -         Easy ink blending techniques  – as I colored my flowers with ink -         In the mood for color  – as I choose a matching color scheme -         Let it shine  – as I added a little bit of shine and texture with embossing   For my color combination I chose something which pairs well with my purple wall. I used the colors from the color scheme but added also green because it felt e little bit more organic like this. I also wanted to have a big floral image ove...

AECP Final Challenge Level 2 Part I

Image
Hello everyone! Today I’m sharing Part I for my AECP Level 2 Final Challenge. T he goal was to create four masculine cards for four different occasions. I don’t do that often masculine cards so I really needed to get creative.😅   I started by doing a brain storming and wrote down alle the things that I relate with masculine cards like colors, themes. And I also pulled out a lot of stuff that I could possibly use. I tried too use geometric dies/designs and plants for an organic look.   To help me plan everything I generated pages I could use for sketches and color combinations. So I always had the overview and could really design my cards well.   I also worked with the color catalogue – this helped me to find different shades of all the masculine colors. I pulled out a lot of color combinations that seem masculine.   I started the sketches by choosing a shape I want for the card. Then I thought about witch elements I could use like stencils, stamps, embossing folders...

AECP - Masking Unleashed

Image
Hello!   Today’s card I created for the AECP Course Masking Unleashed, what of course is all about masking.    I started with Satin Masking Tape to create like a banner to write in my sentiment.  Then I stamped the flowers and leaves from the Wispy Joy Stamp Set. I used the negative mask to color them. I used a blue and a purple for the flowers, loved this combination. So, I went all around my tape. I also stamped some Fragile Foliage in the background for more interest. Then I could take away all the masks.. absolutely the best part 😁 I added just a little bit of pencil and some glitter for some sparkle. My sentiment, also heat embossed with glitter – is German and means something like “favorite human”.  I decided to turn this card in a postcard.. I find this is a great way to say someone that you really love them, without much words.

AECP - markers technique

Image
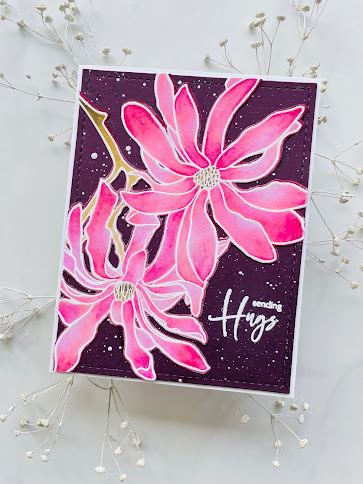
Hi everyone   This card I created for my AECP course Magical Markers Technique. I decide to try the pouncing technique Sara showed. I never did that before, so I was very curious how this will work. Here in Switzerland is winter and I needed some spring vibes – so I went for the Magnolia Ballerina Stamp Set. I heat embossed the flowers in white. This helped me to stay into the lines and I also really love the look of it. Then I started to adding colors using tree markers. R601, R502, C003. I added just a little bit of the darkest color and then I pounced the color with the brighter one. I was really surprised how the ink started to blend in each other. And I think don’t even see that I only pounced the color on the petals. After die cutting I traced the outline with a dark marker which was matching the color of the paper. I found like this the flower really stand out. I added some white splatters in the background for more interest and heat embossed my sentiment in white. I’m quite...