Posts

AECP - In The Mood for Color

Image
Today’s cards I created for the Lessons In the Mood for Color In this lesson I learned what kind of mood colors can create. So far, I have simply chosen the colors of my cards by feel. It's good to understand the effect of the colors and sometimes it helps you then with the color selection. I decided to create three cards with the same design but with different colors to show their effect. In each case, I tried to take the sentiment that most closely matches this mood.   I made my background by going direct to paper with my mini inks to create a mix with three different shades of ink. Then I took the same inks an stamped the Morning Flowers in each color. I really love this Stamp Set, because it creates so much depth just by stamping. For all the leaves I took the same green. I added a little bit of shading with a marker, but not too much, because the stamp already did the work for me. Blue is for Tranquility and Calm Pink for Caring, Sweet and Sensitive Yellow for Cheer Energy and...

Blossoming Creativity Blog Hop + Giveaway ($300 in Total Prizes)

Image
Hi everyone!   Thanks so much for stopping by. Today I’m going to share with you a few thank you cards. Because what is more important than being grateful and appreciating the people you have in your life.😊 And I also have some celebrating cards. I all created with the new products from the Just Imagine October 2022 Release .   My first card I created with the Fairy Tale Floral Stamp and Stencil set. I embossed the flowers with gold embossing powder and colored them with the stencil.  For the background I took some green watercolor and then I stamped the leaves which are actually the decoration for the flowers in green as well. for the sentiment I hot foiled the word thanks from the Versatile Greetings Hot Foil Set.   On my next card I built a heart of flowers. I used the Hill Blossoms Stencil to create the flowers because you can create four flowers and cut them out all at once.  For the background I made some ink blending and added some bubbles with the Tiny ...

AECP - Beyond Basic Backgrounds

Image
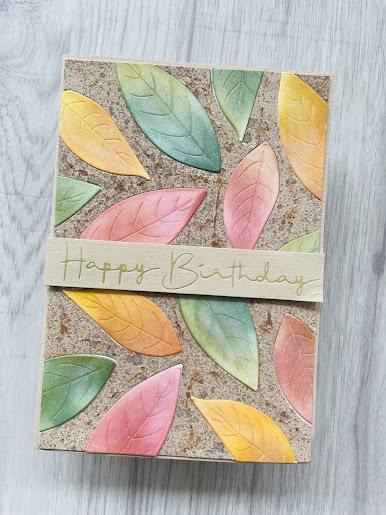
Hi everyone!   I’m starting my AEPC Level 2 now and here is my first card for the lesson Beyond Basics Background.   I decided to create a background with leaves and the inlay technique. When I look outside my window all the trees are so colorful at the moment. So, I’ve been inspired by them.   I started to cut out some leaves from withe cardstock. The dies are actually from the Sunburst Azalea die set. Then I inked them with my blending brushes in different shades of green, rose and yellow. Then I took a piece of brown cardstock and die cut the same leaves from it. And as I wanted to put everything together it happened...🙈 I glued it on my panel on the wrong side. I was able to peel it away again, but of course there was all the glue on my die cuttet piece. I could have done it another time but I already put effort in it and I thought it was the perfect matching cardstock for my leaves (and of course it was my last piece and all my other thousands of thousand papers wil...

Altenew October 2022 Marvelous Monthly Series Release Blog Hop + Giveaway ($300 in Total Prizes!)

Image
Hello everyone!   Thanks for stopping by. You must be here from  Caly Person . Today I like to share with you two projects I created with the new monthly series. I love that there is a coordinating die to build a flower with the Build-A-Garden-Set this time. When I saw this, I really wanted to create a big flower bouget. So I stamped the Dear Dahlias twice and colored them by using the coordinating stencil. After that I die cut them out. Then I put them together. To fill out the bouget a little bit more I used some flowers from the Wispy Joy stamp set and the Cone Flower Stamp set. I all assembled on a green background I created with some ink smoothing. Then I cut out all the pieces for the center flower and colored them with the ink blending tool. They are so easy to put together just by following the numbers and arrows which are engraved. This gives so much of dimension. As I said, I really love this set.😍   My next card is a little bit simpler. I stamped the flowers f...

Altenew September 2022 Enchanted Winter Collection Release Blog Hop + Giveaway ($300 in total prizes)

Image
Hello everyone!   Thank you so much for visiting my blog. You must be here from  LauraJane s  Blog. U nbelievable how creative she always is!   I created some cards I would like to share with you.   My first card I made with the new Daisies stencil that coordinates with embossing folder. I first colored the embossing folder with a brayer and run it through my die cut machine. Then colored the flowers with the stencils in blue and purple. I love this color combination. And with the stencil it is so easy to get great results.  After coloring I put the paper back in the embossing folder and run it through again, so I got back some of the dimension I may have lost with the coloring. I decided to take a small sentiment from the Floral Halo Stamp Set and fussy cut it out. I didn’t want to distract from this beautiful image. I find the daisies literally smile at you, so you certainly feel loved. My next card I created with the Blooming Flower Bed Stencil. With thi...

Altenew September 2022 Marvelous Monthly Series Release Blog Hop + Giveaway ($300 in Total Prizes!)

Image
Hi there!   Thanks for stopping by. You must be here from  Therese Calvird s  Blog.   Today I’m going to share with you some cards I created with the new products that came out today. My absolute favorite one i the Build – A - Garden Pristine and Peonies Set. The flowers are so beautiful and they have just the perfect size to fill an entire card o as focal point of the card. You can get all the new products  here !     For my first card i stamped both images and embossed them with rose embossing powder. Then I colored them with the stencils. This is something I love to do the most and the result is often much better than I expected. Then I cut dem out with the coordinating dies.  I made a background with some light watercolor and splatters. Then I die cut a frame from metallic cardstock and assembled everything together. I tried to put the petals sometimes over and sometimes under the frame, so it gives a little bit of dimension.    ...